I have never been the biggest fan of the Amiga. I generally find it an irritating and overly finicky platform that tries to be too many things and achieves none of them well. Nonetheless, it's an interesting platform and I have had reason to spend a decent amount of time futzing with it, particularly as of late. Along the way I've incidentally found some information that's harder to find online than you'd expect, so I'm going to write it down here.
The Amiga 3000 is a weird, in between Amiga model with a number of quirks. Chief among them is that early models shipped with an incomplete ROM; you might see this referred to as "1.4" or "Superkickstart" and, if your Amiga boots to the above screen, congratulations, that's what you have. (If you want to confirm, power on while holding both mouse buttons to force it into this screen.)
From what I've read, this is quite simply an unfinished firmware variant, halfway between 1.3 and 2.0, and to do anything useful, you have to push the machine in one direction or the other by loading the rest of the firmware from a disk. In other words, these machines choose between KS/WB 1.3 or KS/WB 2.x-3.x on every powerup (though they default to the newer, if present.)
If you own one of these, you're probably here because the hard drive died and you're struggling to get it to boot. Since the inbuilt firmware is incomplete, you will not be able to boot from any normal install media - you might seem to make a tiny bit of progress with one disk or another, but trust me, it's never going to work unless you know exactly what to do. It's not hard, but it's an extremely precise process.
First: You need a Superkickstart disk (aka "SKS") There are two of these and I don't know why. The one I use is:
SuperKickstart-Disk v2.04 r37.175 (1991)(Commodore)(A3000).adf
Get it from the usual sources. I know it's labeled 2.04, but it contains both Kickstart versions.
Ah, you need a way to get this onto an actual disk to put in your actual Amiga? There are a couple options; see the later sections on Goteks, Greaseweazels, ZuluSCSI, WinUAE, etc. down below.
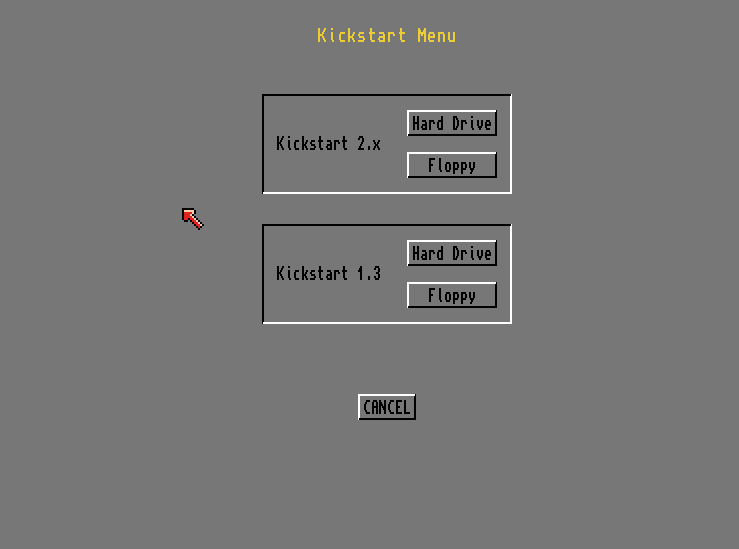
Once you put this in your Amiga and power on, you should be able to pick either of the "Floppy" options on the bootscreen to boot the respective Kickstart. Once it's loaded, it'll ask for a WB floppy.
At this point, if you don't want to do a hard drive install, you're done. Just insert a WB 1.3 or WB 2.04 disk and go about your business.
However, you probably want to do a hard drive install. There are half-baked instructions floating around online explaining how to install one OS or the other or both, all written with the assumption that you've been hanging out on an Amiga forum for 20 years and know certain gibberish terminology. I do not, so none of these were useful and I had to figure it out on my own. I will dispense a useful workflow below.
You need to read all these notes before proceeding or you'll regret it.
Note 1: You do not need to do this process in any particular order, and it doesn't matter what order the partitions are in on the disk.
Note 2: If you don't intend to ever install one of the two OSes, you do not need to create it's partition - but unless you're working with a REALLY tiny drive, I recommend you do it anyway, because it's really not much effort.
Note 3: If, at any point, your A3000 tries to boot the wrong kickstart, boots from HDD instead of FDD, etc. the solution is to hold both mouse buttons during boot. See the "startup incantations" section for more detail on this.
Note 4: All of this works in WinUAE, but you may need to turn off the JIT emulator if you get Guru errors trying to boot WB1.3.
Note 5: Once you finish installing a Workbench, then boot from the hard drive, the Amiga's firmware will hide the other partition. That is, if you boot WB 2.0, you will not be able to see the WB 1.3 partition, and vice versa. For that reason, you need to create a partition (often called Work, but I don't think the name matters) on which you will store all data and programs that will be visible to both OSes. Note however that if you want to install programs / drivers DIRECTLY to either OS drive, you need to make sure to provide enough space when creating the partitions below.
I hate that you have to know about this but you really have to know about this or you'll have big problems. Also I'm pretty sure I have something wrong here but when I read about how this crap works, what I read doesn't match up with reality, so here's my interpretation of what's going on.
Amigas have DEVICE names and VOLUME names. DF0 is the device for floppy drive 0 for instance - this is immutable; DF0 is always DF0.
When you create a partition on a hard drive, that's ALSO a device name... but it's one you can EDIT. And these have to be unique - so during this process you're going to create a partition called WB_2.x, and if you later connect a SECOND drive that ALSO has a WB_2.x, it's going to confuse your Amiga. These device names are alterable after creation without data loss, so if you get into this situation you can always boot from a floppy and fix it from the partition editor (HDToolbox), but you won't be able to access both partitions until you do this.
On top of device names though, there are also volume names. These are part of the filesystem - so sure, you can access the floppy as DF0:, but once you format and name it, you can also access it as e.g. "Workbench 2.0:" (device/volume names always end with a colon, btw). That is to say, both of these are valid simultaneously. And the same is true for hard drive partitions.
So: on my hard drive, I have two partitions named WB_1.3 and WB_2.x, and when I first created them, they appeared on my desktop with names like "WB_1.3:NDOS" (NDOS meaning there's no readable filesystem.) As soon as I formatted them however, they disappeared, and new icons appeared called "Empty", and I then renamed them to "Workbench 1.3" and "Workbench 2.0"
Both names are now valid - but once a hard drive is formatted, the only place you can see the Device name (that I can find) is in HDToolbox, and that's the only place it matters. The icon on the desktop can be renamed once it's been formatted.
So let's sum this up:
For the Amiga 3000 to boot Kickstart 1.3/Workbench 1.3, it needs to see a
partition called WB_1.3 - but you can name that icon anything you want.
For the Amiga 3000 to boot Kickstart 2/Workbench 2, it needs to see a
partition called WB_2.x - but you can name that icon anything you want.
Even if you install KS3/WB3, it needs to go in the WB_2.x partition.
You're going to do this whole segment from WB 2.0 even if you only intend to install 1.3. Trust me, the tooling is just better.
0 at the initial prompt.
2.0Install, then go to Tools, HDToolbox
WB_1.3. (Skip this if you really don't want WB 1.3.)
WB_2.x. (Skip this if you really don't want WB 2.x)
If you want 2.x, it's super easy.
2.0Install and run FormatHD
WB_1.3 disk on the desktop.
Icon menu, and select Format.
Workbench1.3 floppy icon
Shell
copy df0: to wb_1.3: all
Workbench1.3 icon, then open Shell
cd df0:Tools
Makefiles df0: 1.3 Workbench1.3:Devs/kickstart
copy df1: to wb_1.3: all
Obviously this is a weird situation, and if you want, you can just replace the ROMs with newer ones; 2.x and 3.x are supposedly doable, and I'm sure you can get them from various sources, probably ebay and guys on forums. However, I should note that the stock ROMs, at least in mine, are mounted on a "tower" - you'll know what I mean when you look inside your machine, if you have one. The purpose of the tower is apparently to change the pinout on the ROM chips; some machines have it, some don't. Do your own research to find out what this means as far as replacing your chips, since I've never tried it.
The A3000 has a very complex boot process. By default, it will select Kickstart 2.x if available, then boot from an HDD partition called WB_2.x if present. If you want to boot a different KS, different OS, or boot from floppy instead of HDD, you'll need to perform incantations.
The magic sequence is to hold both mouse buttons during boot; this does two completely different things.
Hold both buttons while powering on to select a Kickstart version.
Hold both buttons after selecting kickstart 2.x to change your boot device. That is to say, click the HARD DRIVE or FLOPPY button under KS 2.x, then IMMEDIATELY smash both mouse buttons again.
Note that, once you've booted from EITHER kickstart, you're stuck on that version; if you use the CTRL+A+A combo to restart, you'll still be in the same kickstart, though you can at that point boot from a floppy instead of HDD if you like. To switch kickstarts, you need to power all the way off and back on.
I don't think you can get a boot menu if you pick KS 1.3; it seems to follow a fixed boot order, but maybe I'm wrong.
The boot menu is quite complex but you should be able to figure it out. Gl;hf
Getting data from your PC to your Amiga can be hard. Bootstrapping a machine with no functioning software absolutely requires floppy disks, so at a minimum you need to be able to produce those. Beyond that however you may need to install CD-based software, which is tough if your Amiga only supports a SCSI CDROM and you don't have one; and you may need to move large amounts of data to and from the HDD.
Arguably the easiest solution for floppies is to get a Gotek. They're cheap as dirt, they only require a tiny bit of effort to be converted to the Good Firmware (flashfloppy imo) and they make the entire process far less error prone and much faster. I highly recommend you go this way if you don't care about authenticity. Guides are everywhere online, so just google one.
If you want to write actual floppy disks however, what you want is a Greaseweazel. Technically there are multiple flux imaging controllers that will work, but the GW is cheap as dirt and trivial to use.
If you have an actual SCSI CDROM, or emulator (e.g. ZuluSCSI) and a SCSI-capable Amiga (e.g. A3000) you should be able to use it with an appropriate CDROM driver. There are quite a few, but I've tested and recommend "Asim CDFS."
I have only tried this with a ZuluSCSI emulator. I imagine the BlueSCSI should work similarly, or a SCSI2SD if you're in a pinch.
I've had some quirkiness with the Zulu which I chalk up to it being slightly out of spec versus the Amiga's expectations, but I'm going to tell you how it ought to work. If it doesn't, I recommend you try turning on the DEBUG LOG switch, then power cycling everything. I don't know why this fixes mine, but it seems to.
I found that the Zulu will NOT run from the Amiga 3000's SCSI terminator power, assuming it supplies any; I have been running it off a USB PSU, but you should be able to split off the HDD molex and adapt it down to fit the Zulu.
Anyway, all you should need to do is place an ISO on the Zulu's SD card, then name it "CD3_512.iso" - that's SCSI ID 3, and 512 byte transfers. If you don't include the 512, the Zulu will send 2048-byte chunks and may confuse your Amiga. Also, you can use different SCSI ID numbers, but I recommend avoiding 6 since some Amiga software seems to assume the boot HDD is there.
Once you've done that, install Asim CDFS. Choose "Other" for all the prompts, and then let it scan for CDROMs. The picker should clearly indicate "ZULUSCSI CDROM" in the list; if not, it didn't get detected, frob some switches, power cycle (don't just reboot, unplug EVERYTHING) and try again.
I have not tested an actual CDROM; my assumption is that the workflow will be identical (plug it in, install Asim CDFS) but less janky.
Note that all the Amigas were made before IDE (ATAPI) CDROMs were invented, so AFAIK you will never get one working even if your Amiga has an IDE interface.
I highly recommend getting an emulator. Yeah, it's unrealistically fast, but all remaining 50-pin SCSI drives are rapidly dying. I went through four just trying to get my A3000 installed. Save your sanity and use an emulator; Zulu, Blue, whatever you like.
I have had no trouble at all using the ZuluSCSI for the Amiga's main HDD. I generated an HDF file in WinUAE but I frankly don't know if it's doing anything special; it might just be a file full of zeroes. I placed that file on the Zulu SD card and named it HD6.hdf, and it works perfectly.
Data transfer between the real A3000 and an emulated one has been effortless; I can take the HDF off the SD card and plug it into WinUAE, boot it up, and do everything up to and including installing both OSes, then move the file back to the Zulu and boot it on the real A3000 with no trouble.